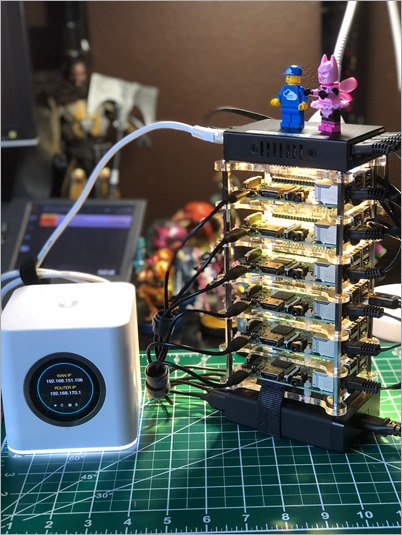
First, why would you do this? Why not. It’s awesome. It’s a learning experience. It’s cheaper to get 6 pis than six “real computers.” It’s somewhat portable. While you can certainly quickly and easily build a Kubernetes Cluster in the cloud within your browser using a Cloud Shell, there’s something more visceral about learning it this way, IMHO. Additionally, it’s a non-trivial little bit of power you’ve got here. This is also a great little development cluster for experimenting. I’m very happy with the result.
By the end of this blog post you’ll have not just Hello World but you’ll have Cloud Native Distributed Containerized RESTful microservice based on ARMv7 w/ k8s Hello World! as a service. (original Tweet). 😉
Not familiar with why Kubernetes is cool? Check out Julia Evans’ blog and read her K8s posts and you’ll be convinced!
Table of Contents
Hardware List (scroll down for Software)
Here’s your shopping list. You may have a bunch of this stuff already. I had the Raspberry Pis and SD Cards already.
- 6 – Raspberry Pi 3 – I picked 6, but you should have at least 3 or 4.
- One Boss/Master and n workers. I did 6 because it’s perfect for the power supply, perfect for the 8-port hub, AND it’s a big but not unruly number.
- 6 – Samsung 32Gb Micro SDHC cards – Don’t be too cheap.
- Faster SD cards are better.
- 2×6 – 1ft flat Ethernet cables – Flat is the key here.
- They are WAY more flexible. If you try to do this with regular 1ft cables you’ll find them inflexible and frustrating. Get extras.
- 1 – Anker PowerPort 6 Port USB Charging Hub – Regardless of this entire blog post, this product is amazing.
- It’s almost the same physical size as a Raspberry Pi, so it fits perfect at the bottom of your stack. It puts out 2.4a per port AND (wait for it) it includes SIX 1ft Micro USB cables…perfect for running 6 Raspberry Pis with a single power adapter.
- 1 – 7 layer Raspberry Pi Clear Case Enclosure – I only used 6 of these, which is cool.
- I love this case, and it looks fantastic.
- 1 – Black Box USB-Powered 8-Port Switch – This is another amazing and AFAIK unique product.
- An overarching goal for this little stack is that it be easy to move around and set up but also to power. We have power to spare, so I’d like to avoid a bunch of “wall warts” or power adapters. This is an 8 port switch that can be powered over a Raspberry Pi’s USB. Because I’m given up to 2.4A to each micro USB, I just plugged this hub into one of the Pis and it worked no problem. It’s also…wait for it…the size of a Pi. It also include magnets for mounting.
- 1 – Some Small Router– This one is a little tricky and somewhat optional.
- You can just put these Pis on your own Wifi and access them that way, but you need to think about how they get their IP address. Who doles out IPs via DHCP? Static Leases? Static IPs completely?
- The root question is – How portable do you want this stack to be? I propose you give them their own address space and their own router that you then use to bridge to other places. Easiest way is with another router (you likely have one lying around, as I did. Could be any router…and remember hub/switch != router.
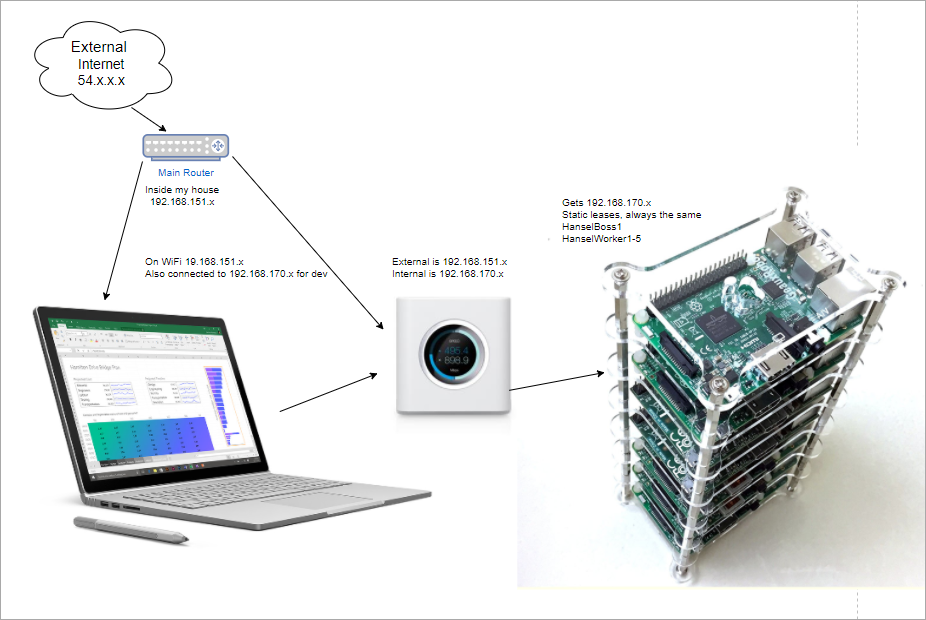
- Here is a bad network diagram that makes the point, I think. The idea is that I should be able to go to a hotel or another place and just plug the little router into whatever external internet is available and the cluster will just work. Again, not needed unless portability matters to you as it does to me.
- What I WISH existed was a small router – similar to that little 8 port hub – that was powered off USB and had an internal and external Ethernet port. This ZyXEL Travel Router is very close…hm…
- Optional – Pelican Case if you want portability. I’ll see what airport security thinks. O_O
- Optional – Tiny Keyboard and Mouse – Raspberry Pis can put out about 500mA per port for mice and keyboards. The number one problem I see with Pis is not giving them enough power and/or then having an external device take too much and then destabilize the system. This little keyboard is also a touchpad mouse and can be used to debug your Pi when you can’t get remote access to it. You’ll also want an HMDI cable occasionally.
- You’re Rich – If you have money to burn, get the 7″ Touchscreen Display and a Case for it, just to show off htop in color on one of the Pis.
Dodgey Network Diagram
Disclaimer
OK, first things first, a few disclaimers.
The software in this space is moving fast. There’s a non-zero chance that some of this software will have a new version out before I finish this blog post. In fact, when I was setting up Kubernetes, I created a few nodes, went to bed for 6 hours, came back and made a few more nodes and a new version had come out. Try to keep track, keep notes, and be aware of what works with what.
Next, I’m just learning this stuff. I may get some of this wrong. While I’ve built (very) large distributed systems before, my experience with large orchestrators (primarily in banks) was with large proprietary ones in Java, C++, COM, and later in C#, .NET 1.x,2.0, and WCF. It’s been really fascinating to see how Kubernetes thinks about these things and comparing it to how we thought about these things in the 90s and very early 2000s. A lot of best practices that were HUGE challenges many years ago are now being codified and soon, I hope, will “just work” for a new generation of developer. At least another full page of my resume is being marked [Obsolete] and I’m here for it. Things change and they are getting better.
Software
Get your Raspberry PIs and SD cards together. Also blog as you’re going to find yourself there a lot. He’s the author of OpenFaas, which I’ll be using today and he’s done a LOT of work making this experiment possible. So thank you Alex for being awesome! He has a great post on how Multi-stage Docker files make it possible to effectively use .NET Core on a Raspberry Pi while still building on your main machine. He and I spent a few late nights going around and around to make this easy.
Alex has put together a Gist we iterated on and I’ll summarize here. You’ll do these instructions n times for all machines.
You’ll do special stuff for the ONE master/boss node and different stuff for the some number of worker nodes.
ADVANCED TIP! If you know what you’re doing Linux-wise, you should shell script that Alex made, then SKIP to the node-specific instructions below. If you want to learn more, do it step by step.
ALL NODES
- Burn Jessie to a SD Card
- You’re going to want to get a copy of Raspbian Jesse Lite and burn it to your SD Cards with Etcher, which is the only SD Card Burner you need. It’s WAY better than the competition and it’s open source.
- Creating an empty file called “ssh” before you put the card in the Raspberry Pi
- SSH into the new Pi
- ssh pi@raspberrypi
- Login pi, password raspberry.
- ssh pi@raspberrypi
- Change the Hostname
I ran
rasbpi-config
then immediately reboot with “sudo reboot”
- Install Docker
curl -sSL get.docker.com | sh && sudo usermod pi -aG docker
- Disable Swap. Important, you’ll get errors in Kuberenetes otherwise
sudo dphys-swapfile swapoff && sudo dphys-swapfile uninstall && sudo update-rc.d dphys-swapfile remove
- Go edit /boot/cmdline.txt with your favorite editor, or use
sudo nano /boot/cmdline
and add this at the very end. Don’t press enter.
cgroup_enable=cpuset cgroup_enable=memory
- Install Kubernetes
curl -s https://packages.cloud.google.com/apt/doc/apt-key.gpg | sudo apt-key add - && echo "deb http://apt.kubernetes.io/ kubernetes-xenial main" | sudo tee /etc/apt/sources.list.d/kubernetes.list && sudo apt-get update -q && sudo apt-get install -qy kubeadm
MASTER/BOSS NODE
After ssh’ing into my main node, I used /ifconfig eth0 to figure out what the IP adresss was. Ideally you want this to be static (not changing) or at least a static lease. I logged into my router and set it as a static lease, so my main node ended up being 192.168.170.2, and .1 is the router itself.
Then I initialized this main node
sudo kubeadm init --apiserver-advertise-address=192.168.170.2
This took a WHILE. Like 10-15 min, so be patient.
Kubernetes uses this admin.conf for a ton of stuff, so you’re going to want a copy in your $HOME folder so you can call “kubectl” easily later, copy it and take ownership.
mkdir -p $HOME/.kube sudo cp -i /etc/kubernetes/admin.conf $HOME/.kube/config sudo chown $(id -u):$(id -g) $HOME/.kube/config
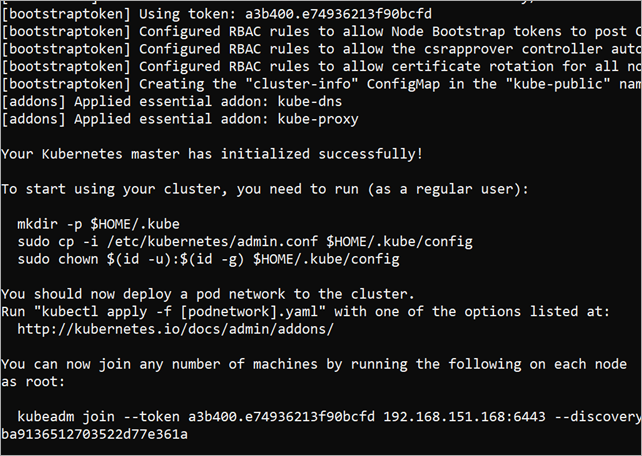
When this is done, you’ll get a nice print out with a ton of info and a token you have to save. Save it all. I took a screenshot.
WORKER NODES
Ssh into your worker nodes and join them each to the main node. This line is the line you needed to have saved above when you did a kubectl init.
kubeadm join --token d758dc.059e9693bfa5 192.168.170.2:6443 --discovery-token-ca-cert-hash sha256:c66cb9deebfc58800a4afbedf0e70b93c086d02426f6175a716ee2f4d
Did it work?
While ssh’ed into the main node – or from any networked machine that has the admin.conf on it – try a few commands.
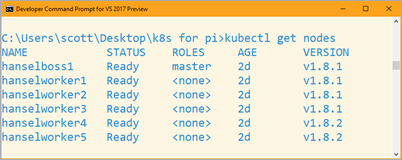
Here I’m trying “kubectl get nodes” and “kubectl get pods.”
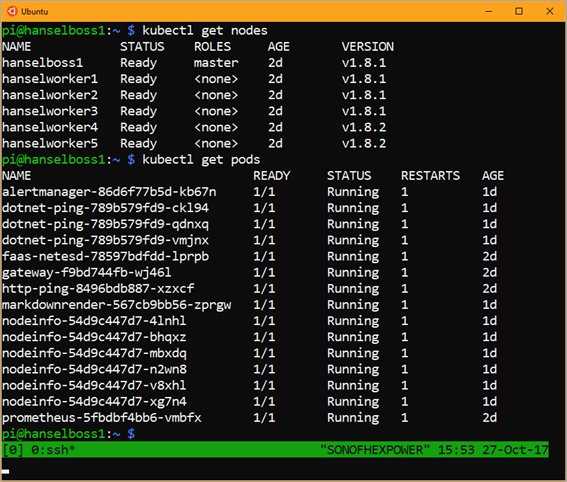
Note that I already have some stuff installed, so you’ll want try “kubectl get pods –namespace kube-system” to see stuff running. If everything is “Running” then you can finish setting up networking. Kubernetes has fifty-eleven choices for networking and I’m not qualified to pick one. I tried Flannel and gave up and then tried Weave and it just worked. YMMV. Again, double check Alex’s Gist if this changes.
kubectl apply -f https://git.io/weave-kube-1.6
At this point you should be ready to run some code!
Hello World…with Markdown
Back to Alex’s gist, I’ll try this “markdownrender” app. It will take some Markdown and return HTML.
Go get the function.yml from here and create the new app on your new cluster.
$ kubectl create -f function.yml
$ curl -4 http://localhost:31118 -d "# test"
<p><h1>test</h1></p>
This part can be tricky – it was for me. You need to understand what you’re doing here. How do we know the ports? A few ways. First, it’s listed as nodePort in the function.yml that represents the desired state of the application.
We can also run “kubectl get svc” and see the ports for various services.
pi@hanselboss1:~ $ kubectl get svc
NAME             TYPE        CLUSTER-IP       EXTERNAL-IP   PORT(S)          AGE
alertmanager     NodePort    10.103.43.130    <none>        9093:31113/TCP   1d
dotnet-ping      ClusterIP   10.100.153.185   <none>        8080/TCP         1d
faas-netesd      NodePort    10.103.9.25      <none>        8080:31111/TCP   2d
gateway          NodePort    10.111.130.61    <none>        8080:31112/TCP   2d
http-ping        ClusterIP   10.102.150.8     <none>        8080/TCP         1d
kubernetes       ClusterIP   10.96.0.1        <none>        443/TCP          2d
markdownrender   NodePort    10.104.121.82    <none>        8080:31118/TCP   1d
nodeinfo         ClusterIP   10.106.2.233     <none>        8080/TCP         1d
prometheus       NodePort    10.98.110.232    <none>        9090:31119/TCP   2d
See those ports that are outside:insider? You can get to markdownrender directly from 31118 on an internal IP like localhost, or the main/master IP. Those 10.x.x.x are all software networking, you can not worry about them. See?
pi@hanselboss1:~ $ curl -4 http://192.168.170.2:31118 -d "# test"
<h1>test</h1>

pi@hanselboss1:~ $ curl -4 http://10.104.121.82:31118 -d "# test"
curl: (7) Failed to connect to 10.104.121.82 port 31118: Network is unreachable
Can we access this cluster from another machine? My Windows laptop, perhaps?
Access your Raspberry Pi Kubernetes Cluster from your Windows Machine (or elsewhere)
I put KubeCtl on my local Windows machine put it in the PATH.
- I made a little local batch file like this. I may end up with multiple clusters and I want it easy to switch between them.
- SET KUBECONFIG=”C:usersscottdesktopk8s for piadmin.conf
Once you have Kubectl on another machine that isn’t your Pi, try running “kubectl proxy” and see if you can hit your cluster like this. Remember you’ll get weird “Connection refused” if kubectl thinks you’re talking to a local cluster.
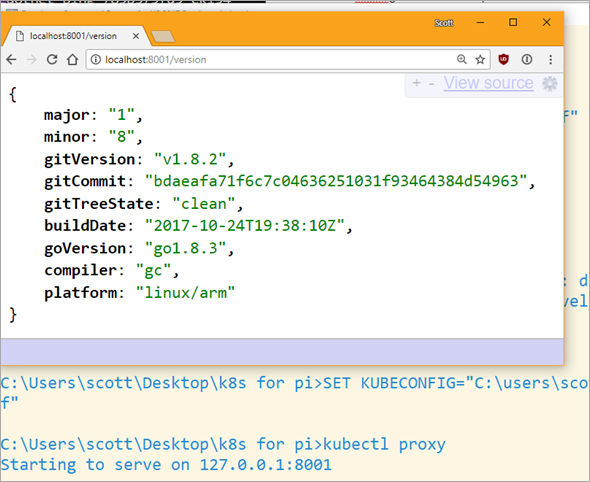
Here you can get to localhost:8001/api and move around, then you’ve successfully punched a hole over to your cluster (proxied) and you can treat localhost:8001 as your cluster. So “kubectl proxy” made that possible.
If you have WSL (Windows Subsystem for Linux) – and you should – then you could also do this and TUNNEL to the API. But I’m going to get cert errors and generally get frustrated. However, tunneling like this to other apps from Windows or elsewhere IS super useful. What about the Kubernetes Dashboard?
~ $ sudo ssh -L 8001:10.96.0.1:443 [email protected]
I’m going to install the Kubernetes Dashboard like this:
kubectl apply -f https://raw.githubusercontent.com/kubernetes/dashboard/master/src/deploy/alternative/kubernetes-dashboard-arm.yaml
Pay close attention to that URL! There are several sites out there that may point to older URLs, non ARM dashboard, or use shortened URLs. Make sure you’re applying the ARM dashboard. I looked here https://github.com/kubernetes/dashboard/tree/master/src/deploy.
Notice I’m using the “alternative” dashboard. That’s for development and I’m saying I don’t care at all about security when accessing it. Be aware.
I can see where my Dashboard is running, the port and the IP address.
pi@hanselboss1:~ $ kubectl get svc --namespace kube-system
NAME                   TYPE        CLUSTER-IP   EXTERNAL-IP   PORT(S)         AGE
kube-dns               ClusterIP   10.96.0.10   <none>        53/UDP,53/TCP   2d
kubernetes-dashboard   ClusterIP   10.98.2.15   <none>        80/TCP          2d
NOW I can punch a hole with that nice ssh tunnel…
~ $ sudo ssh -L 8080:10.98.2.15:80 [email protected]
I can access the Kubernetes Dashboard now from my Windows machine at http://localhost:8080 and hit Skip to login.
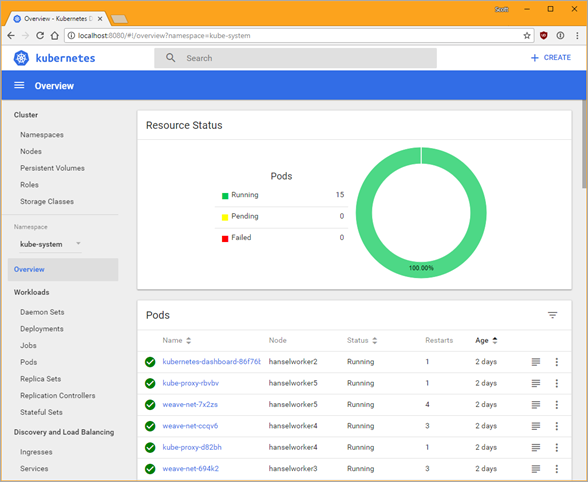
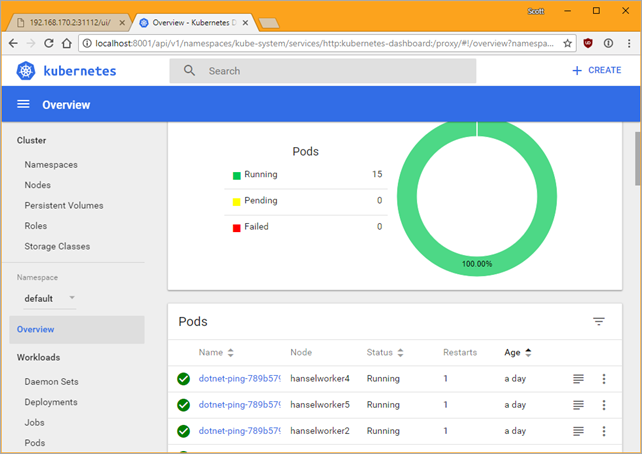
Do note the Namespace dropdown and think about what you’re viewing. There’s the kube-system stuff that manages the cluster
Adding OpenFaas and calling a serverless function
Let’s go to the next level. We’ll install OpenFaas – think Azure Functions or Amazon Lambda, except for your own Docker and Kubernetes cluster. To be clear, OpenFaas is an Application that we will run on Kubernetes, and it will make it easier to run other apps. Then we’ll run other stuff on it…just some simple apps like Hello World in Python and .NET Core. OpenFaas is one of several open source “Serverless” solutions.
Do you need to use OpenFaas? No. But if your goal is to write a DoIt() function and put it on your little cluster easily and scale it out, it’s pretty fabulous.
Remember my definition of Serverless…there ARE servers, you just don’t think about them.
Serverless Computing is like this – Your code, a slider bar, and your credit card.
Let’s go.
.NET Core on OpenFaas on Kubernetes on Raspberry Pi
I ssh’ed into my main/master cluster Pi and set up OpenFaas:
git clone https://github.com/alexellis/faas-netes && cd faas-netes

kubectl apply -f faas.armhf.yml,rbac.yml,monitoring.armhf.yml
Once OpenFaas is installed on your cluster, here’s Alex’s great instructions on how to setup your first OpenFaas Python function, so give that a try first and test it. Once we’ve installed that Python function, we can also hit http://192.168.170.2:31112/ui/ (where that’s your main Boss/Master’s IP) and see it the OpenFaas UI.
OpenFaas and the “faas-netes” we setup above automates the build and deployment of our apps as Docker Images to Kuberetes. It makes the “Developer’s Inner Loop” simpler. I’m going to make my .NET app, build, deploy, then change, build, deploy and I want it to “just work” on my cluster. And later, and I want it to scale.
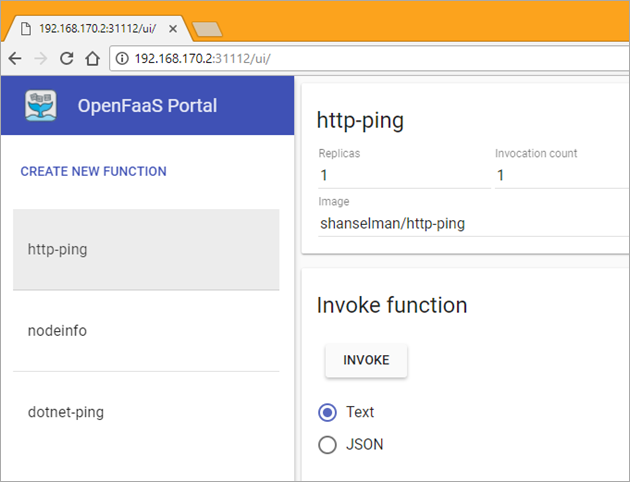
I’m doing .NET Core, and since there is a runtime for .NET Core for Raspberry Pi (and ARM system) but no SDK, I need to do the build on my Windows machine and deploy from there.
Quick Aside: There are docker images for ARM/Raspberry PI for running .NET Core. However, you can’t build .NET Core apps (yet?) directly ON the ARM machine. You have to build them on an x86/x64 machine and then get them over to the ARM machine. That can be SCP/FTPing them, or it can be making a docker container and then pushing that new docker image up to a container registry, then telling Kubernetes about that image. K8s (cool abbv) will then bring that ARM image down and run it. The technical trick that Alex and I noticed was of course that since you’re building the Docker image on your x86/x64 machine, you can’t RUN any stuff on it. You can build the image but you can’t run stuff within it. It’s an unfortunate limitation for now until there’s a .NET Core SDK on ARM.
What’s required on my development machine (not my Raspberry Pis?
- I installed KubeCtl (see above) in the PATH
- I installed OpenFaas’s Faas-CLI command line and put it in the PATH
- I installed Docker for Windows. You’ll want to make sure your machine has some flavor of Docker if you have a Mac or Linux machine.
- I ran docker login at least once.
- I installed .NET Core from http://dot.net/core
Here’s the gist we came up with, again thanks Alex! I’m going to do it from Windows.
I’ll use the faas-cli to make a new function with charp. I’m calling mine dotnet-ping.
faas-cli new --lang csharp dotnet-ping
I’ll edit the FunctionHandler.cs to add a little more. I’d like to know the machine name so I can see the scaling happen when it does.
using System;
using System.Text;

namespace Function
{
    public class FunctionHandler
    {
        public void Handle(string input) {
            Console.WriteLine("Hi your input was: "+ input + " on " + System.Environment.MachineName);
        }
    }
}
Check out the .yml file for your new OpenFaas function. Note the gateway IP should be your main Pi, and the port is 31112 which is OpenFaas.
I also changed the image to include “shanselman/” which is my Docker Hub. You could also use a local Container Registry if you like.
provider:
  name: faas
  gateway: http://192.168.170.2:31112

functions:
  dotnet-ping:
    lang: csharp
    handler: ./dotnet-ping
    image: shanselman/dotnet-ping
Head over to the ./template/csharp/Dockerfile and we’re going to change it. Ordinarily it’s fine if you are publishing from x64 to x64 but since we are doing a little dance, we are going to build and publish the .NET apps as linux-arm from our x64 machine, THEN push it, we’ll use a multi stage docker file. Change the default Docker file to this:
FROM microsoft/dotnet:2.0-sdk as builder

ENV DOTNET_CLI_TELEMETRY_OPTOUT 1

# Optimize for Docker builder caching by adding projects first.

RUN mkdir -p /root/src/function
WORKDIR /root/src/function
COPY ./function/Function.csproj  .

WORKDIR /root/src/
COPY ./root.csproj  .
RUN dotnet restore ./root.csproj

COPY .  .

RUN dotnet publish -c release -o published -r linux-arm

ADD https://github.com/openfaas/faas/releases/download/0.6.1/fwatchdog-armhf /usr/bin/fwatchdog
RUN chmod +x /usr/bin/fwatchdog

FROM microsoft/dotnet:2.0.0-runtime-stretch-arm32v7

WORKDIR /root/
COPY --from=builder /root/src/published .
COPY --from=builder /usr/bin/fwatchdog /

ENV fprocess="dotnet ./root.dll"
EXPOSE 8080
CMD ["/fwatchdog"]
Notice a few things. All the RUN commands are above the second FROM where we take the results of the first container and use its output to build the second ARM-based one. We can’t RUN stuff because we aren’t on ARM, right?
We use the Faas-Cli to build the app, build the docker container, AND publish the result to Kubernetes.
faas-cli build -f dotnet-ping.yml --parallel=1
faas-cli push -f dotnet-ping.yml
faas-cli deploy -f dotnet-ping.yml --gateway http://192.168.170.2:31112
And here is the dotnet-ping command running on the pi, as seen within the Kubernetes Dashboard.
I can then scale them out like this:
kubectl scale deploy/dotnet-ping --replicas=6
And if I hit it multiple times – either via curl or via the dashboard, I see it’s hitting different pods:
If I want to get super fancy, I can install Grafana – a dashboard manager by running locally in my machine on port 3000
docker run -p 3000:3000 -d grafana/grafana
Then I can add OpenFaas a datasource by pointing Grafana to http://192.168.170.2/31119 which is where the Prometheus metrics app is already running, then import the OpenFaas dashboard from the grafana.json file that is in the I cloned it from.
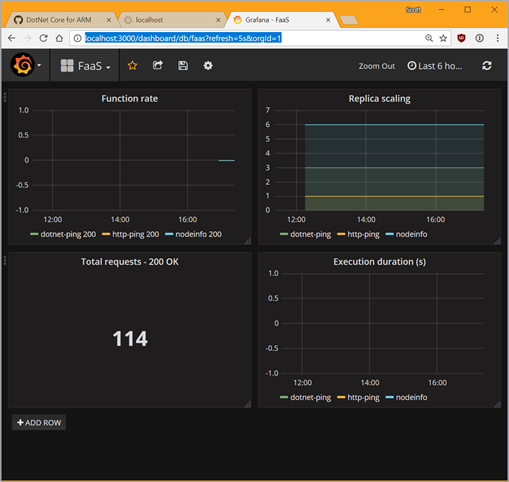
Super cool. I’m going to keep using this little Raspberry Pi Kubernetes Cluster to learn as I get ready to do real K8s in Azure! Thanks to Alex Ellis for his kindness and patience and to Jessie Frazelle for making me love both Windows AND Linux!
* If you like this blog, please do use my Amazon links as they help pay for projects like this! They don’t make me rich, but a few dollars here and there can pay for Raspberry Pis!
Sponsor: Check out JetBrains Rider: a new cross-platform .NET IDE. Edit, refactor, test and debug ASP.NET, .NET Framework, .NET Core, Xamarin or Unity applications. Learn more and download a 30-day trial!
© 2017 Scott Hanselman. All rights reserved.
This content was originally published here.
